
Introduction
Did you know a single security flaw in your Flask application could jeopardize your entire user database? Although Flask is a popular and flexible Python web framework, it requires stringent security measures to prevent vulnerabilities. This post will explore essential security extensions and best practices for Flask, including Flask-Security, Flask-Talisman, and Flask-SeaSurf. Additionally, we will highlight the importance of using a Static Application Security Testing (SAST) tool to detect vulnerabilities early in the development process.
Common Security Challenges in Flask
While powerful and flexible, Flask applications can only be protected from several security threats if properly safeguarded. Here, we explore typical security issues you might encounter:
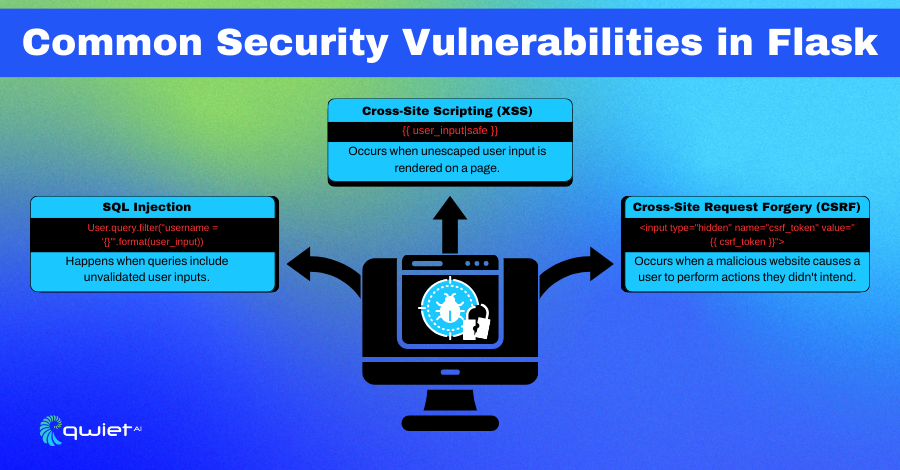
Cross-Site Scripting (XSS)
Cross-Site Scripting (XSS) is a security flaw that allows attackers to inject malicious scripts into web pages viewed by other users. This can happen when user input is not properly sanitized. In Flask, improper handling of templates can lead to XSS vulnerabilities.
Lets illiterate this below:
| from flask import Flask, render_template_string, request app = Flask(__name__) @app.route(‘/’) def index(): user_input = request.args.get(‘input’, ”) return render_template_string(‘<h1>Hello, {{ input }}</h1>’, input=user_input) if __name__ == ‘__main__’: app.run() |
In the above snippet, the user_input variable is directly rendered into the template without any sanitization, allowing an attacker to inject malicious JavaScript. For example, accessing the page with ?input=<script>alert(‘XSS’)</script> would execute the script.
SQL Injection
SQL Injection occurs when an attacker can manipulate the SQL queries executed by an application. In Flask, using raw SQL queries without proper parameterization can make your application vulnerable to SQL Injection attacks.
For example, see below:
| from flask import Flask, request import sqlite3 app = Flask(__name__) @app.route(‘/user’) def get_user(): user_id = request.args.get(‘id’) conn = sqlite3.connect(‘database.db’) cursor = conn.cursor() query = “SELECT * FROM users WHERE id = “ + user_id cursor.execute(query) user = cursor.fetchone() return f“User: {user}” if __name__ == ‘__main__’: app.run() |
In the example above the user_id parameter is directly concatenated into the SQL query. An attacker could manipulate the id parameter to execute arbitrary SQL commands, such as 1; DROP TABLE users.
Cross-Site Request Forgery (CSRF)
Cross-Site Request Forgery (CSRF) is an attack that tricks users into performing actions they didn’t intend to. In Flask, CSRF attacks can be mitigated using tokens to ensure that the requests are legitimate.
| from flask import Flask, request, session from flask_wtf.csrf import CSRFProtect app = Flask(__name__) app.secret_key = ‘supersecretkey’ csrf = CSRFProtect(app) @app.route(‘/transfer’, methods=[‘POST’]) def transfer(): amount = request.form[‘amount’] # perform the transfer operation return f”Transferred {amount}!” if __name__ == ‘__main__’: app.run() |
By enabling CSRF protection with Flask-WTF, the application automatically includes CSRF tokens in forms. This ensures that the requests come from authenticated users and not malicious sites attempting to perform actions on their behalf.
Key Security Extensions for Flask
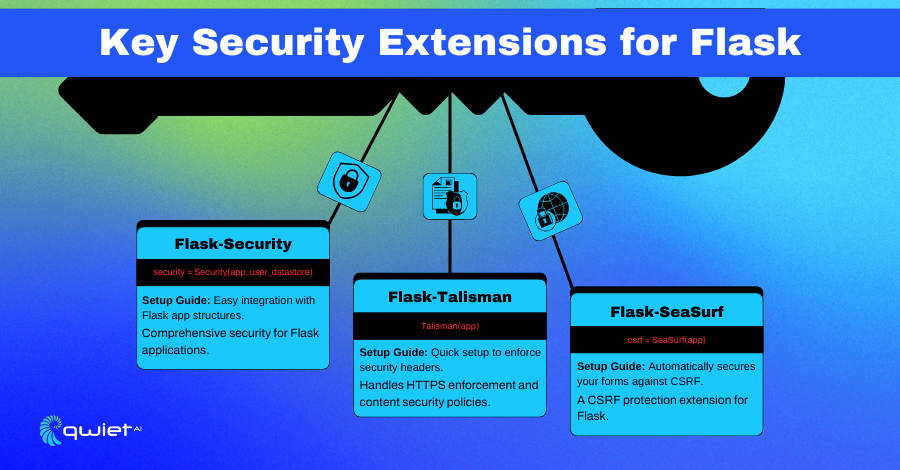
Flask-Security integrates security features such as authentication, role-based access control, and password management into a Flask application. It simplifies adding these features by providing a unified interface and common functionality. This extension is particularly useful for developers who want to incorporate robust security mechanisms without building them from the ground up.
To implement Flask-Security, you must set up the necessary configurations and integrate them with SQLAlchemy for database management. Flask-Security handles user registration, login, and session management tasks, making it a comprehensive solution for securing Flask applications.
| from flask import Flask from flask_security import Security, SQLAlchemyUserDatastore, UserMixin, RoleMixin, login_required from flask_sqlalchemy import SQLAlchemy app = Flask(__name__) app.config[‘SECRET_KEY’] = ‘supersecretkey’ # Secret key for session management app.config[‘SQLALCHEMY_DATABASE_URI’] = ‘sqlite:///security.db’ # Database URL app.config[‘SECURITY_PASSWORD_SALT’] = ‘somesalt’ # Password salt for hashing db = SQLAlchemy(app) # Define a many-to-many relationship between users and roles roles_users = db.Table(‘roles_users’, db.Column(‘user_id’, db.Integer(), db.ForeignKey(‘user.id’)), db.Column(‘role_id’, db.Integer(), db.ForeignKey(‘role.id’)) ) class Role(db.Model, RoleMixin): id = db.Column(db.Integer(), primary_key=True) # Primary key name = db.Column(db.String(80), unique=True) # Role name class User(db.Model, UserMixin): id = db.Column(db.Integer, primary_key=True) # Primary key email = db.Column(db.String(255), unique=True) # User email password = db.Column(db.String(255)) # User password active = db.Column(db.Boolean()) # Active user flag roles = db.relationship(‘Role’, secondary=roles_users, backref=db.backref(‘users’, lazy=‘dynamic’)) # Setup Flask-Security user_datastore = SQLAlchemyUserDatastore(db, User, Role) security = Security(app, user_datastore) @app.route(‘/profile’) @login_required # Protect this route with authentication def profile(): return ‘This is a protected profile page.’ if __name__ == ‘__main__’: db.create_all() # Create database tables app.run() |
The app.config settings include essential configurations such as the secret key for session management and the database URI. The roles_users table establishes a many-to-many relationship between users and roles, allowing each user to have multiple roles.
The User and Role classes extend SQLAlchemy models and include Flask-Security mixins to handle user and role attributes. The SQLAlchemyUserDatastore is initialized with the User and Role models, and Flask-Security is set up using this datastore.
The @login_required decorator protects the /profile route, ensuring that only authenticated users can access it. When the application starts, the db.create_all() call creates the necessary database tables.
Flask-Talisman
Flask-Talisman enhances the security of your Flask application by adding HTTP security headers. These headers help protect against web vulnerabilities such as Cross-Site Scripting (XSS), clickjacking, and other code injection attacks. By configuring security headers, Flask-Talisman ensures your application adheres to modern security standards and best practices.
The extension is easy to integrate and requires minimal configuration. You can customize the security policies according to your application’s needs, providing a flexible approach to enhancing web security.
| from flask import Flask from flask_talisman import Talisman app = Flask(__name__) # Configure Talisman with a Content Security Policy (CSP) csp = { ‘default-src’: [ “‘self'”, # Allow content from the same origin ‘https://cdnjs.cloudflare.com’ # Allow content from specified sources ], ‘img-src’: ‘*’, # Allow images from any source } Talisman(app, content_security_policy=csp) @app.route(‘/’) def home(): return ‘Hello, Secure World!’ if __name__ == ‘__main__’: app.run() |
The csp dictionary defines the application’s Content Security Policy (CSP). This policy restricts the sources from which content can be loaded, helping to prevent XSS attacks by only allowing scripts and resources from trusted origins.
The default-src directive allows content to be loaded only from the same origin (‘self’) and a specific external source (https://cdnjs.cloudflare.com). This ensures that scripts and other resources are only loaded from these trusted sources.
The img-src directive allows images to be loaded from any source, providing flexibility while securing other types of content.
The Talisman instance is created with the Flask app and the CSP configuration. This automatically adds the security headers to all responses, enhancing the application’s security.
Flask-SeaSurf
Flask-SeaSurf is an extension designed to protect Flask applications against Cross-Site Request Forgery (CSRF) attacks. CSRF attacks trick users into performing actions they didn’t intend to by exploiting their authenticated session. Flask-SeaSurf mitigates this risk by ensuring that state-changing requests are accompanied by a valid CSRF token.
The implementation of Flask-SeaSurf is straightforward and requires minimal code changes. It provides a seamless way to integrate CSRF protection into your Flask application.
| from flask import Flask, request from flask_seasurf import SeaSurf app = Flask(__name__) csrf = SeaSurf(app) # Initialize SeaSurf with the Flask app @app.route(‘/submit’, methods=[‘POST’]) def submit(): data = request.form[‘data’] return f”Data submitted: {data}” if __name__ == ‘__main__’: app.run() |
The SeaSurf instance is created and passed to the Flask app to initialize CSRF protection. This setup ensures that all POST requests must include a valid CSRF token. When a form is submitted to the /submit route, Flask-SeaSurf checks for the presence of a CSRF token in the request. The request is rejected if the token is missing or invalid, preventing unauthorized actions.
The data variable captures the form data submitted by the user. This is a simple demonstration of a state-changing request protected by Flask-SeaSurf. By integrating Flask-SeaSurf, developers can enhance the overall security of their web applications by protecting them against CSRF attacks.
Implementing HTTPS and Secure Cookies in Flask
HTTPS is paramount for securing web applications, as it guarantees encrypted data between a client and a server. This encryption is vital for safeguarding sensitive information, such as login credentials, personal details, and payment information, from interception by malicious actors. Without HTTPS, data transmission is vulnerable to numerous threats, including man-in-the-middle attacks, where an attacker can intercept and alter data.
Implementing HTTPS is not just about data protection; it also reinforces the trust and integrity of your web application. Modern browsers now issue warnings for non-HTTPS sites, which can significantly undermine user confidence. By adopting HTTPS, you ensure the security of user data and foster a trustworthy online environment.
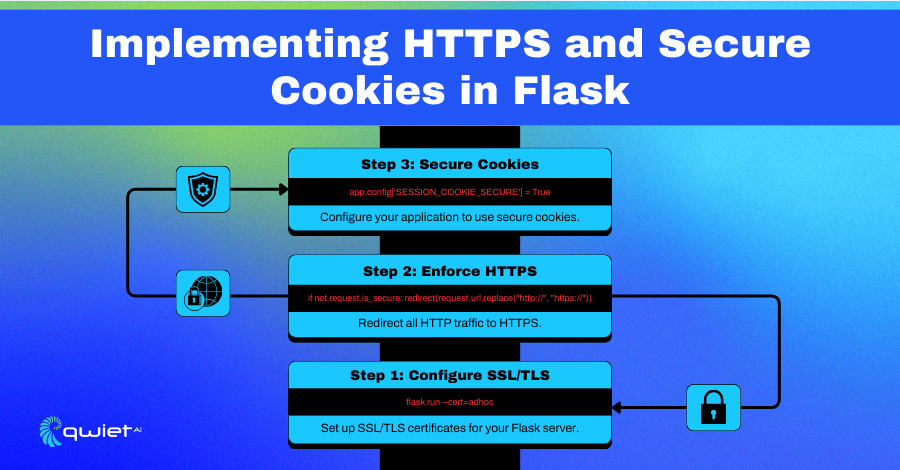
How to Enforce HTTPS in Flask
Enforcing HTTPS in your Flask application ensures that all communications between the client and the server are encrypted, essential for securing sensitive data. Flask-Talisman is a useful extension that automatically redirects HTTP requests to HTTPS, ensuring that all data transmission is secure.
| from flask import Flask from flask_talisman import Talisman app = Flask(__name__) # Enforce HTTPS with Talisman Talisman(app) @app.route(‘/’) def home(): return ‘Hello, Secure World!’ if __name__ == ‘__main__’: app.run() |
You need to initialize the Talisman extension with your Flask app to enforce HTTPS using Flask-Talisman. In the provided code snippet, Flask-Talisman is imported and configured by default to enforce HTTPS.
Any HTTP request to your server will be automatically redirected to its HTTPS counterpart, ensuring all communications are encrypted. This setup provides a straightforward way to enhance the security of your application by ensuring that all data transmitted is protected from potential interception.
Managing Secure Cookies
Managing secure cookies is a an important aspect of web application security. Secure cookies help protect session data and prevent attacks such as session hijacking by ensuring that cookies are only sent over HTTPS connections. Additionally, setting cookies to HTTPOnly prevents them from being accessed via JavaScript, mitigating the risk of XSS attacks.
| from flask import Flask, session app = Flask(__name__) app.config[‘SECRET_KEY’] = ‘supersecretkey’ app.config[‘SESSION_COOKIE_SECURE’] = True # Ensure cookies are only sent over HTTPS app.config[‘SESSION_COOKIE_HTTPONLY’] = True # Prevent JavaScript access to cookies @app.route(‘/’) def home(): session[‘user’] = ‘Alice’ return ‘Secure cookies are set!’ if __name__ == ‘__main__’: app.run(ssl_context=(‘cert.pem’, ‘key.pem’)) # Run the server with SSL/TLS |
In the code snippet, several configurations are set to manage secure cookies. The SESSION_COOKIE_SECURE configuration ensures that cookies are only sent over HTTPS, which prevents them from being transmitted over insecure HTTP connections.
This is essential for protecting cookies from being intercepted by attackers. The SESSION_COOKIE_HTTPONLY setting prevents cookies from being accessed through JavaScript, which helps mitigate the risk of XSS attacks by ensuring that cookies cannot be easily stolen via malicious scripts.
The server is run with SSL/TLS by specifying the certificate and key files in the app.run method, which ensures that the server supports HTTPS. A secure session cookie with the user’s information is set when a user visits the homepage. This cookie is protected by the configurations and can only be transmitted over secure HTTPS connections, ensuring it is safe from interception and misuse.
Utilizing Flask for Secure User Authentication and Authorization
Securely managing user sessions and authentication is paramount in protecting user credentials and maintaining session integrity. Implementing strong authentication mechanisms ensures that only authenticated users can access protected resources.
Flask-Login is a powerful extension that simplifies session management in Flask applications. It provides functionalities for handling user logins, session management, and user logout while safeguarding against session fixation attacks by ensuring that sessions are properly handled and terminated.
| from flask import Flask, request, redirect, url_for, render_template from flask_sqlalchemy import SQLAlchemy from flask_login import LoginManager, UserMixin, login_user, login_required, logout_user, current_user app = Flask(__name__) app.config[‘SECRET_KEY’] = ‘supersecretkey’ # Secret key for session management app.config[‘SQLALCHEMY_DATABASE_URI’] = ‘sqlite:///users.db’ # SQLite database URI db = SQLAlchemy(app) login_manager = LoginManager(app) login_manager.login_view = ‘login’ # View to redirect to for login class User(UserMixin, db.Model): id = db.Column(db.Integer, primary_key=True) # User ID username = db.Column(db.String(150), unique=True) # Username password = db.Column(db.String(150)) # Password (hashed in production) @login_manager.user_loader def load_user(user_id): return User.query.get(int(user_id)) # Load user by ID @app.route(‘/login’, methods=[‘GET’, ‘POST’]) def login(): if request.method == ‘POST’: username = request.form[‘username’] password = request.form[‘password’] user = User.query.filter_by(username=username).first() if user and user.password == password: # Password check (hash comparison in production) login_user(user) # Log the user in return redirect(url_for(‘dashboard’)) # Redirect to the dashboard return render_template(‘login.html’) # Render the login template @app.route(‘/dashboard’) @login_required # Protect this route, requires login def dashboard(): return f’Hello, {current_user.username}!’ # Greet the logged-in user if __name__ == ‘__main__’: db.create_all() # Create database tables app.run() |
The code snippet sets up Flask-Login to manage user sessions securely. The User model represents users in the database, extending UserMixin to include essential attributes for session management. The load_user function loads a user from the database by their ID, which Flask-Login uses to manage user sessions.
The login route handles user authentication by checking the provided username and password against the database. If the credentials are correct, login_user logs the user in and redirects them to the dashboard route, protected by the @login_required decorator, ensuring only authenticated users can access it. The db.create_all() call initializes the database tables, and the application runs with app.run(). This setup provides a secure and straightforward way to manage user sessions and authentication in a Flask application.
Implementing Flask-Login for Handling User Sessions
Implementing Flask-Login to handle user sessions involves setting up login, logout, and user session management routes. Flask-Login simplifies these tasks by providing decorators and functions to manage user authentication and session states.
| from flask import Flask, redirect, url_for from flask_sqlalchemy import SQLAlchemy from flask_login import LoginManager, UserMixin, login_user, logout_user, login_required app = Flask(__name__) app.config[‘SECRET_KEY’] = ‘supersecretkey’ app.config[‘SQLALCHEMY_DATABASE_URI’] = ‘sqlite:///users.db’ db = SQLAlchemy(app) login_manager = LoginManager(app) class User(UserMixin, db.Model): id = db.Column(db.Integer, primary_key=True) username = db.Column(db.String(150), unique=True) password = db.Column(db.String(150)) @login_manager.user_loader def load_user(user_id): return User.query.get(int(user_id)) @app.route(‘/login’, methods=[‘GET’, ‘POST’]) def login(): if request.method == ‘POST’: username = request.form[‘username’] password = request.form[‘password’] user = User.query.filter_by(username=username).first() if user and user.password == password: login_user(user) return redirect(url_for(‘dashboard’)) return ‘Login Page’ # Simplified for demonstration @app.route(‘/logout’) @login_required def logout(): logout_user() # Log the user out return redirect(url_for(‘login’)) @app.route(‘/dashboard’) @login_required def dashboard(): return ‘Dashboard – Logged In’ if __name__ == ‘__main__’: db.create_all() app.run() |
This code snippet demonstrates how to implement Flask-Login to handle user sessions. The User model is defined as before, and the load_user function loads users by ID. The login route handles user authentication, checking credentials, and logging in users with login_user.
The logout route uses logout_user to log users out, ensuring their session is terminated. The dashboard route is protected by the @login_required decorator, allowing access only to authenticated users. The db.create_all() call initializes the database, and the application runs with app.run(). This setup provides a clear and secure method for managing user sessions in a Flask application.
Techniques for Secure Authorization in Flask Apps
Authorization in Flask applications ensures users have the necessary permissions to access specific resources or perform actions. Implementing role-based access control (RBAC) effectively manages authorization, allowing you to define roles and permissions for different users.
| from flask import Flask from flask_sqlalchemy import SQLAlchemy from flask_security import Security, SQLAlchemyUserDatastore, UserMixin, RoleMixin, login_required, roles_required app = Flask(__name__) app.config[‘SECRET_KEY’] = ‘supersecretkey’ app.config[‘SQLALCHEMY_DATABASE_URI’] = ‘sqlite:///users.db’ db = SQLAlchemy(app) roles_users = db.Table(‘roles_users’, db.Column(‘user_id’, db.Integer(), db.ForeignKey(‘user.id’)), db.Column(‘role_id’, db.Integer(), db.ForeignKey(‘role.id’)) ) class Role(db.Model, RoleMixin): id = db.Column(db.Integer(), primary_key=True) name = db.Column(db.String(80), unique=True) class User(UserMixin, db.Model): id = db.Column(db.Integer, primary_key=True) username = db.Column(db.String(150), unique=True) password = db.Column(db.String(150)) roles = db.relationship(‘Role’, secondary=roles_users, backref=db.backref(‘users’, lazy=’dynamic’)) user_datastore = SQLAlchemyUserDatastore(db, User, Role) security = Security(app, user_datastore) @app.route(‘/admin’) @login_required @roles_required(‘admin’) # Only users with ‘admin’ role can access this route def admin(): return ‘Admin Dashboard’ if __name__ == ‘__main__’: db.create_all() app.run() |
This code snippet implements role-based access control (RBAC) using Flask-Security. The Role and User models are defined to manage roles and their associations with users.
The roles_users table establishes a many-to-many relationship between users and roles. The user_datastore connects Flask-Security with the SQLAlchemy models. The @roles_required(‘admin’) decorator protects the admin route, ensuring that only users with the ‘admin’ role can access it.
This configuration provides a strong authorization mechanism, allowing you to control access to different parts of your application based on user roles, enhancing the security and integrity of your Flask application.
Secure Your Flask App with SAST
Using a Static Application Security Testing (SAST) tool like Qwiet, in your Flask development process is a smart move for enhancing security. SAST tools analyze your source code, bytecode, or binaries to find vulnerabilities without running the program. This means you can catch security issues early in the development phase, which is crucial for preventing vulnerabilities from reaching production.
SAST tools are thorough, scanning your entire codebase for security problems like injection flaws, buffer overflows, and insecure configurations. They provide detailed reports and actionable insights, helping you understand the root causes of vulnerabilities and how to fix them efficiently. This not only boosts the security of your Flask app but also improves your code quality and helps you stay compliant with industry standards.
Integrating SAST tools into your continuous integration/continuous deployment (CI/CD) pipeline automates security checks, making them consistent and reliable. This approach, often called “shifting left,” embeds security practices early in development. By catching vulnerabilities early, you reduce the cost and effort of fixing them later, promote a security-first mindset among your team, and ultimately deliver a more secure and reliable Flask application.
Conclusion
In this article, we have discussed securing Flask applications by addressing critical vulnerabilities such as Cross-Site Scripting (XSS), SQL injection, and Cross-Site Request Forgery (CSRF) attacks. We detailed the implementation of essential security extensions, including Flask-Security, Flask-Talisman, and Flask-SeaSurf. We highlighted the benefits of integrating a Static Application Security Testing (SAST) tool for early vulnerability detection. These security measures are vital for safeguarding user data and ensuring the integrity of your application.
Ready to enhance the security of your Flask application? Book a demo today to see how Qwiet can help secure your codebase.